Tactical Analysis: Burnley
After more than three months of suspension, Pep Guardiola's Manchester City return to the Etihad today where they will take on Sean Dyche's Burnley. Despite a disappointing season that currently sees them 23 points behind Liverpool, City…
After more than three months of suspension, Pep Guardiola's Manchester City return to the Etihad today where they will take on Sean Dyche's Burnley. Despite a disappointing season that currently sees them 23 points behind Liverpool, City will be heavily favored for today's clash. Nevertheless, Burnley will be a formidable opponent, as demonstrated in this tactical analysis.
Burnley's Key Players
Dwight McNeil:McNeil is a key for Burnley in both possession and delivering from set pieces. He always favors his left foot, preferring to drift inside into the half-spaces.

Charlie Taylor: Able to overlap and hit crosses into the box, Taylor thrives thanks to McNeil’s central presence. This is very useful for Dyche because crosses from these areas directed at the far post are hard to close down without completely shifting a whole defensive block.

Chris Wood: Wood is Burnley’s main number 9 and top scorer this season. He is a constant threat in the box due to his strength in 1v1 aerial duels, and he can also wreak havoc on defenses due to his size and movement to attack the ball with pace and power.

James Tarkowski: Tarkowski excels at reading and winning 50/50 aerial duels around the halfway line, allowing Burnley to regain possession when they press the opposition off of goal kicks. Tarkowski also rarely loses headers in his own box, making it hard for the opposition to score from crosses into the Burnley penalty area.

Burnley in Possession
Build Up:Burnley always play direct to their 9 (typically Wood). They funnel around him to try and win the second ball; upon winning the 2nd ball, they are already into the 2nd phase.
2nd Phase:Burnley have two common patterns that they use to break a mid block.
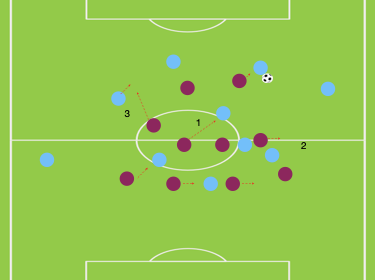
- McNeil comes deep in the half space while Taylor pushes higher forward. If the full back follows McNeil this far inside, Burnley play an aerial ball to an advancing Taylor.If the outside midfielder decides to tuck in to close the passing lane to McNeil, Burnley play an advancing Taylor on the ground. He then usually whips an early cross into the box.If the wide midfielder stays and the full back does not follow McNeil, Burnley play into McNeil’s feet. Receiving on the half turn, he is keen to drive at the defenders in front of him.
2. Burnley launch the ball into the channel. The player in possession waits until both strikers drift near one CB.
- Once the long ball is played, the right sided striker moves directly beneath the duel.
- McNeil also moves underneath the duel but slightly further away + fills the left side.
- Jack Cork and Ashley Westwood both form a layer underneath McNeil.
- If the 2nd ball is won by Burnley, they are dangerous. Since they overload a small area to win the 2nd ball, upon winning possession they can now maintain an overload.

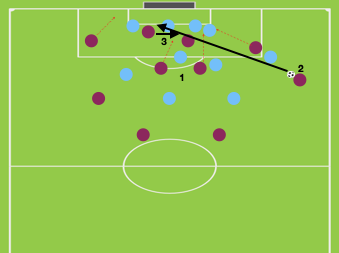
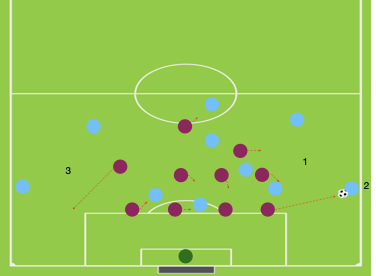
Final third:Burnley constantly have their two big and strong strikers in the area.
- When a cross is played into the box, surrounding numbers arrive late.
- The cross usually goes to the far post.
- Most often when the area is congested, the cross is met with a header across the box to a player arriving late.
Burnley In Possession to Out of Possession Transition
From 2nd Phase: Loss of possession from Burnley usually occurs on the loss of the 2nd ball. Because of the whole Burnley team pinching the space where the 1st ball duel will occur, if they lose the 2nd ball, there is a ton of space present away from this zone to counter.
From Final 3rd: Loss of possession from Burnley in the final third occurs from not controlling the cross. Because of the numbers that they pour into the box/have arrived late, there is space between the box and their back 4.
Burnley Out of Possession
Press:When Burnley press, they press in a 1-4-3-1-2 shape.
- They man mark the opposition's six.
- The 3 in midfield focus on pitch occupancy (spread out, can travel to full back as pass is played) rather than tightness (protection of space between lines). This encourages the team to play long balls, as they are confident in their ability to win aerial duels.

Mid Block:Burnley’s mid block is in a typical 1-4-4-2 shape.
- Ball-far midfielder steps to the free 6 upon an entry pass should the two 9s not be able to cut the line effectively.
- It is a very compact, narrow block that shifts from left to right. It is not necessarily focused on closing space in the middle of the pitch, but rather the space on the side that the ball is on.
- Wide midfielder presses an in possession third (wide) CB after the line of confrontation is met.
Deep Block:Burnley’s deep block is a 1-4-4-2.
- Burnley’s block shifts to one side to have a defensive overload when the ball is played out wide towards a sideline.
- The ball-side fullback steps to an advanced wide player, looking to close down the space for the winger to attack quickly.
- If there is an advanced-opposite interior and the ball is switched quickly to the opposite side, the fullback stays with the midfielder (closing the channel) rather than traveling out to the wide winger. The marker of this winger is done by the recovering wide midfielder.
Burnley - Threats
McNeil - Taylor attacking dynamic: McNeil and Taylor’s occupation of separate zones provides a constant threat to the opposition. McNeil slides in from the left flank into the half space, while Taylor pushes forward. Taylor is able to either draw numbers away from McNeil to allow him to receive in the half space or attack a long ball.
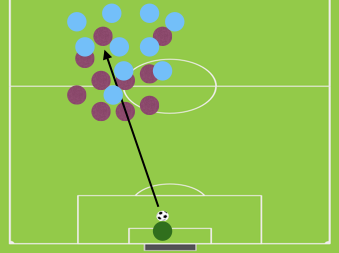
Rapid pitch progression due to overloading the second ball zone: This danger is exactly what Burnley are all about. The long, high hit balls into the channels offer time for the Burnley players to surround the area to win a knock down off of the striker. Once they win the second ball, they are in the final third attacking with an overload.
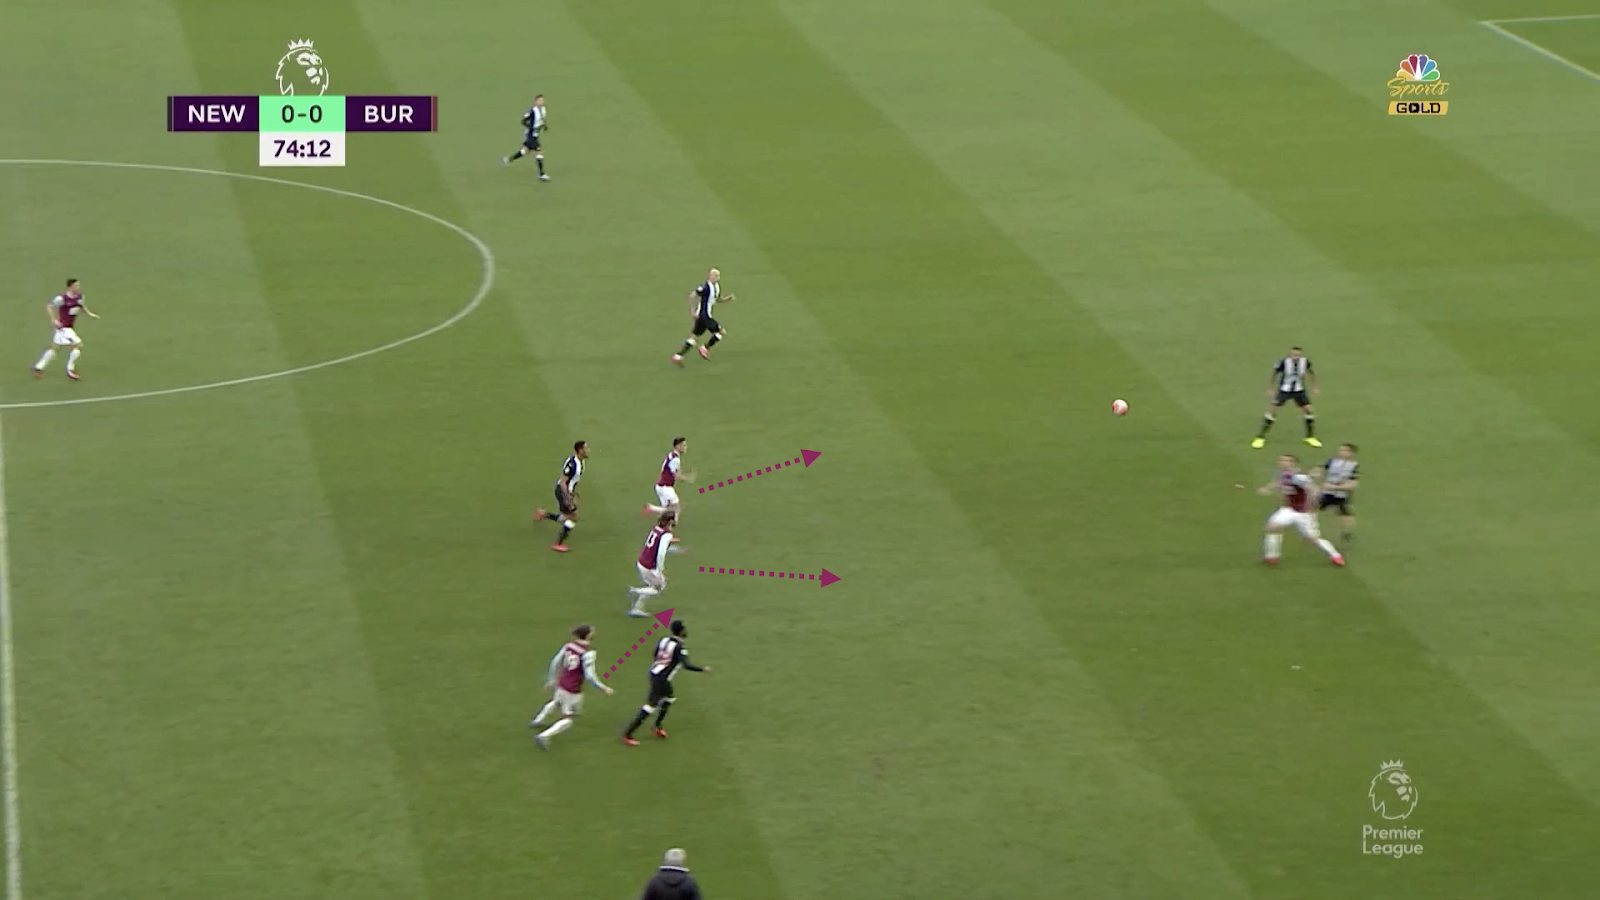
Image: A punt from Nick Pope into Wood is surrounded by advancing Burnley players, each covering different areas where the second ball could go. A knock down from Wood leads to Jeff Hendrick carrying the ball forward into the final third with numbers joining him (4v2).
Burnley - Opportunities for Manchester City
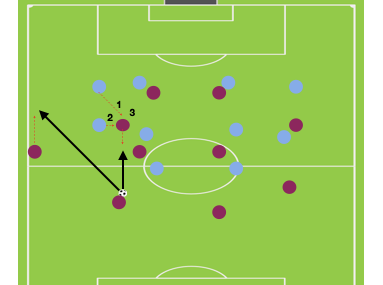
Use a double 6 to play out of Burnley’s high pressure:Burnley’s 1-4-3-1-2 pressing shape is highly vulnerable to teams that play with two 6s while building up. The two 6’s + the goalkeeper overload the 1-2 of Burnley (5v3) which allows for a successful build up should Burnley not commit more numbers into their first 2 lines of pressure. If they do step one of the midfield 3 up, there are spaces present between the lines to bypass the press and progress up the pitch.
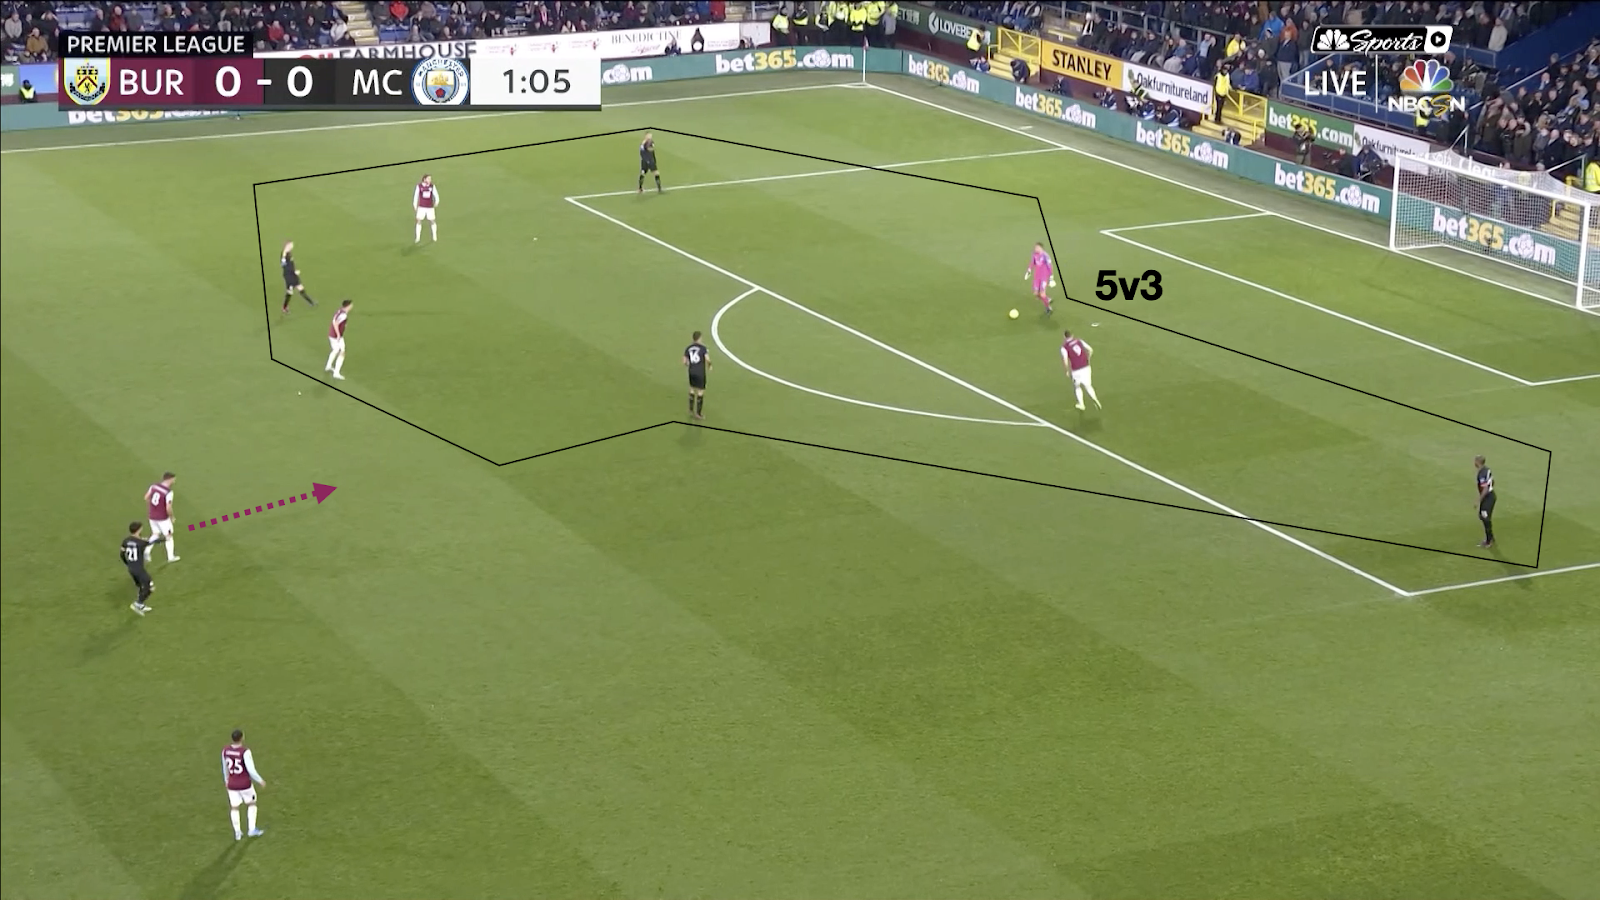
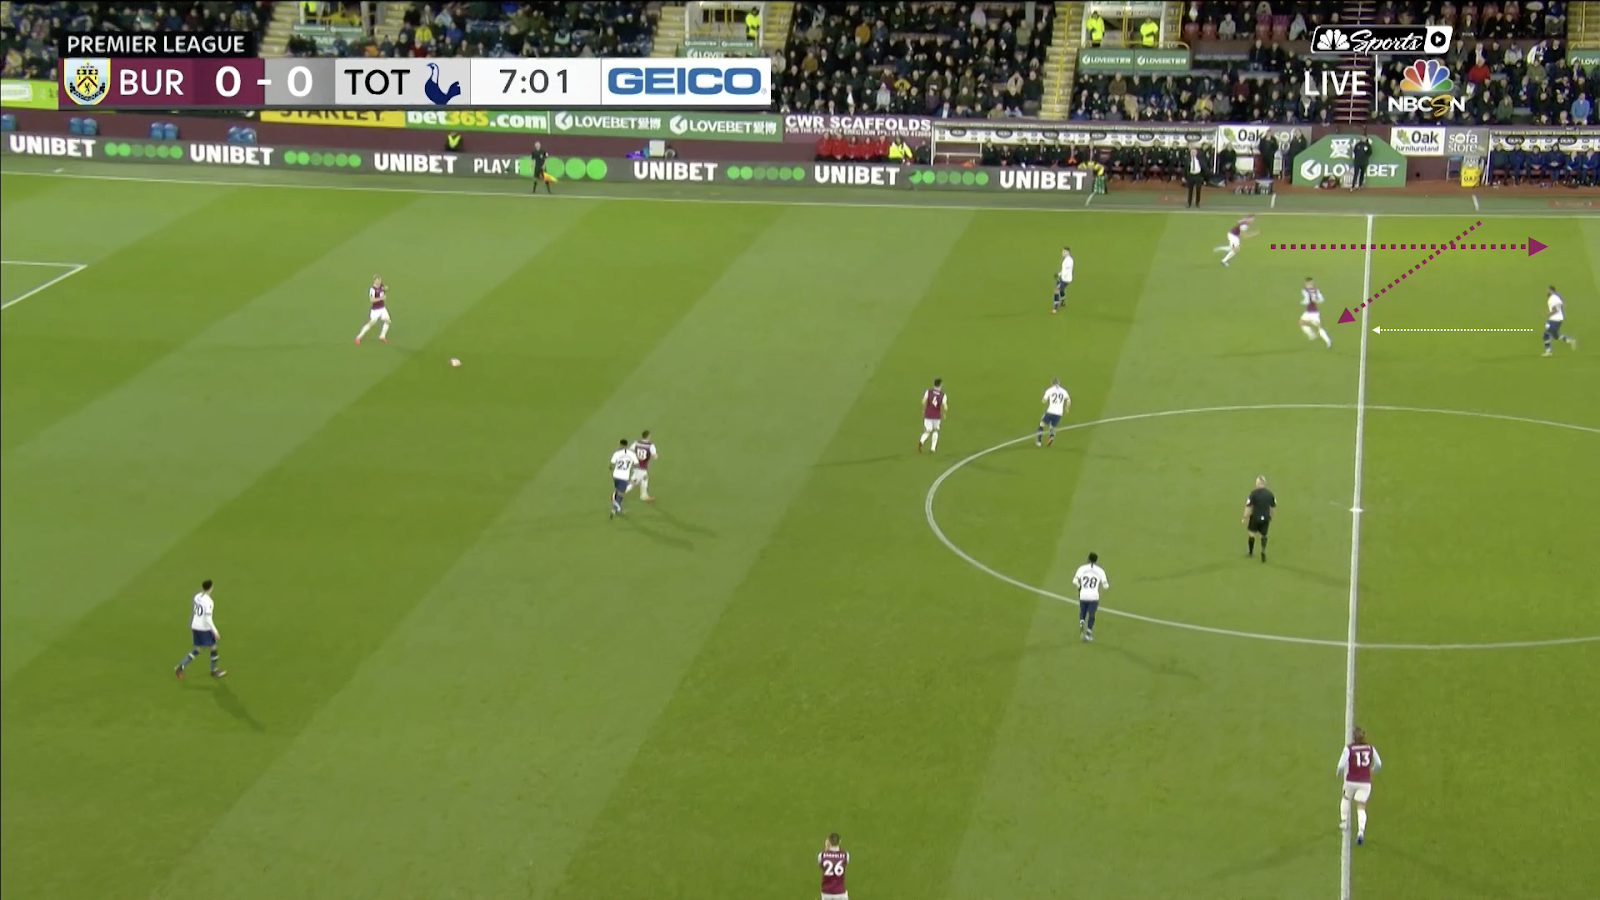
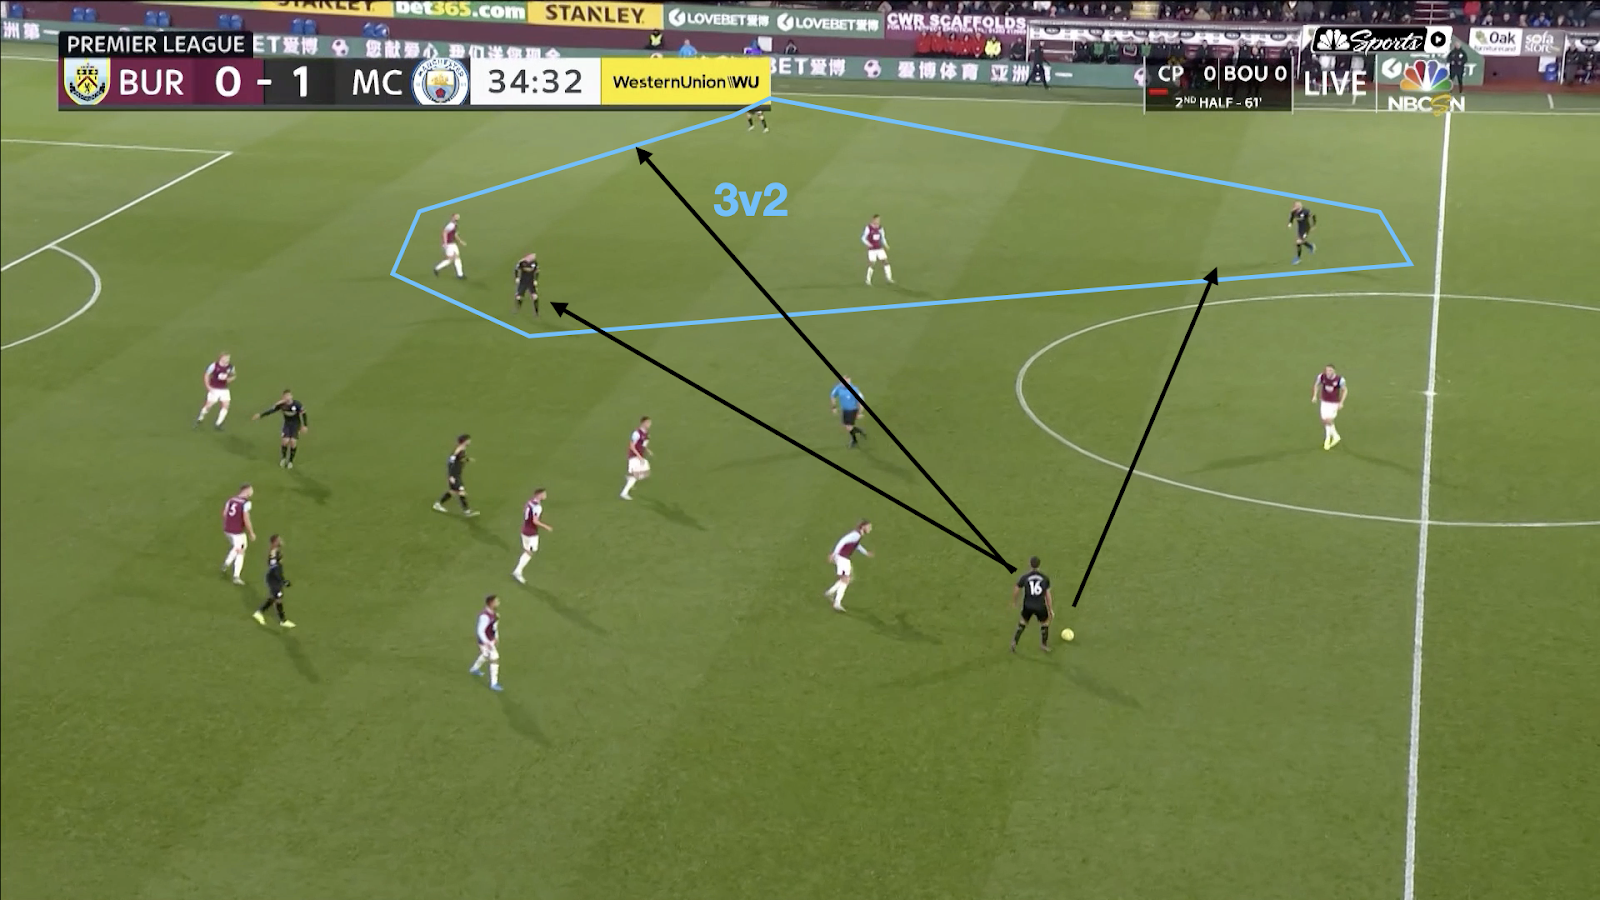
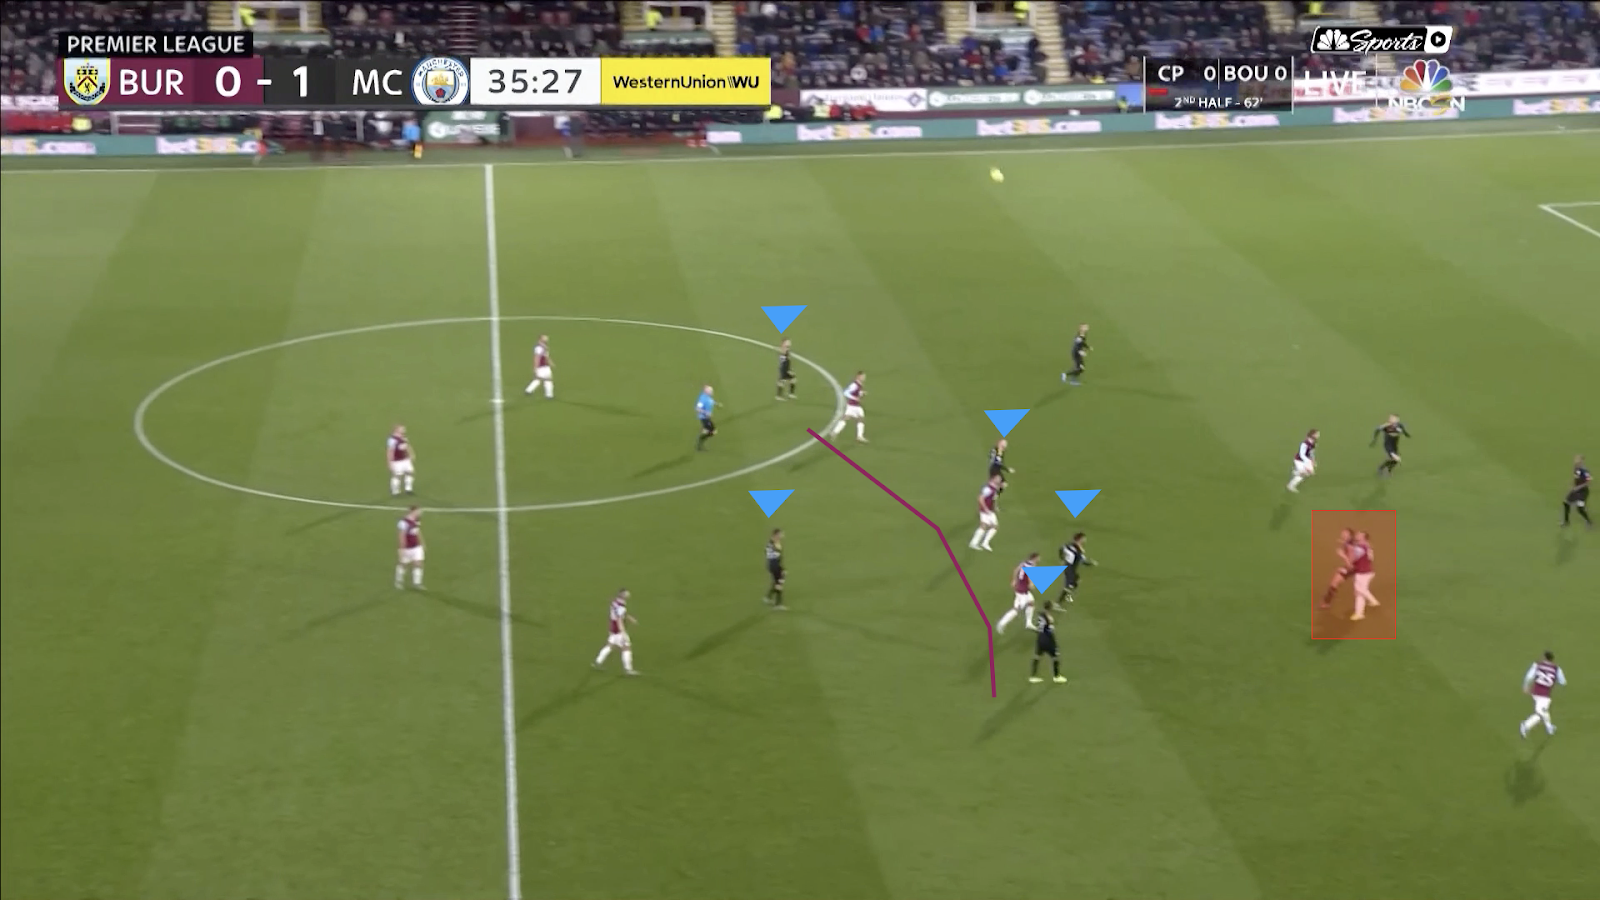
Image: Kevin de Bruyne drops deeper to create a 2v1 on Cork with Rodri, forcing Danny Drinkwater to make a decision: step to Rodri or stay in position. If he steps to Rodri, David Silva will be able to drift on the sides of his cover shadow to receive and progress play up the pitch.
Quick Circulation:Due to Burnley’s emphasis on trying to limit the opposition to one side, a quick switch to the other side before Burnley set the trap provides an opportunity to attack good match ups on the opposite side. This may not be as much of an opportunity for less quality teams than City, but 2v2/3v3 are numbers that Man City will take and attack all day against a team like Burnley.
Out of Possession to In Possession Transition: As mentioned before, Burnley are prone to counter attacks after losing the 2nd balls of the long passes into the channels. If a team can play out of this zone, the space + amount of numbers remaining between the ball and goal are very fruitful for any team to take an advantage of.
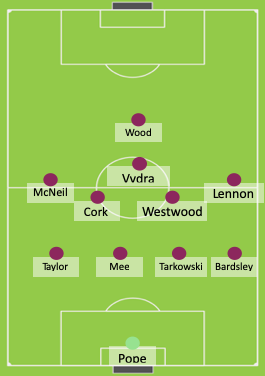
Expected Starting XI
Anticipated Starting XI: I anticipate that Dyche will go with his 1-4-4-2 in and out of possession. He will look to press City during their build up in the 1-4-3-1-2 to try and tempt City into playing long.
Mee and Tarkowski are by far the best CBs at the club and Dyche’s go-tos. Taylor and Bardsley seem to be their first choice fullbacks as they both are able to defend well and cross the ball accurately from their flanks.
McNeil is important to give Burnley a 1v1 threat out wide to try and open up more space inside for Barnes and Wood to get on the end of crosses.
Surprise Starting XI
An unexpected XI that Dyche could go for would be a 1-4-4-1-1 system that sees Matej Vydra and Aaron Lennon replace Jeff Hendrick and Ashley Barnes respectively.
This system would allow for Burnley to eliminate more space between their midfield and defensive lines by having Vydra sit on Rodri. This removes Cork or Westwood having to jump to Rodri should the front 2 not block the passing lane correctly.
Vydra withdrawn from Wood also allows him to naturally be positioned to pick up the 2nd balls off of Wood. However, Burnley usually don’t have much of an issue with this in their normal 1-4-4-2 shape. Lennon’s inclusion would allow for more threat and pace on the outside to possibly hit City through the wide spaces in transition.
However, only playing with 1 striker will allow for Kyle Walker to have license to create numerical superiority by means of overlaps or joining in as an extra midfielder depending on the situation.
How Man City will deal with Burnley
De Bruyne and Rodri will form a double 6 in the build up, forcing Burnley to respond if they want to force City to play long. If they do want to press both Rodri and De Bruyne, it will open up space between the lines for Foden to move into. If they stay in their 1-4-3-1-2 pressing shape, then City will be able to build out with superiority.
Against Burnley’s mid block, City should emphasize maintaining possession on the left until Burnley start to attempt to lock them onto this side. This can be achieved by Raheem Sterling positioning himself in the half space while Benjamin Mendy advances higher up the sideline, aiming to occupy Phil Bardsley.
If Burnley do not want to shift Cork over to Phil Foden, Sterling and Foden will find themselves in a 2v1 against Westwood. If Burnley shift Cork over onto Foden, Walker should invert and look for a passing lane to receive and attack with Bernardo and De Bruyne against Taylor and McNeil.
Upon a circulation across City’s back 3 (Laporte, Fernandinho, Walker) against Burnley’s mid block, McNeil will likely step to Walker upon reception. This is where De Bruyne may drop into a false FB role to create from a deeper position. Moments for De Bruyne to pick up this position include when City are looking to control the match and slow the tempo down or if City need assistance progressing past Burnley’s first few lines in a controlled manner.

The most effective way of breaking Burnley’s deep block is to get in behind and cross from the byline by means of the channels. If City keep the tempo high and consistently attack the wide areas after switches with overlaps, underlaps, and high quality in 1v1 wide situations, Man City will be able to access these areas. Even with Walker and Mendy advancing up the pitch, Fernandinho and Laporte + Rodri should more than be able to control the long balls into an isolated Wood on transition.
If pressure is applied and Burnley are forced to hit long, they are less likely to have an overload in the zone underneath the duel. If Burnley are allowed to hit these passes whenever they would like, they will have a higher chance of winning the second ball as they can prepare to overload underneath the duel.
Potential Threats to the Game Plan
If City carelessly turn the ball over in the wide areas, Hendrick and McNeil will be able to counter attack with lots of space as Fernandinho, Laporte, and Rodri will be focused centrally to control counters. With the progressive movements of Walker and Mendy to create numerical overloads, it is highly unlikely that they will be able to track back and catch up to control the wide spaces on the counter for Burnley.
As always with Burnley, if City are having difficulty controlling the second ball nodded down from the forwards, Burnley will have high quality opportunities to score from. Rodri is key for City in this area. With only playing 20 minutes against Arsenal, he should be fit enough physically to read and compete for the 2nd balls.
If Foden is not constantly finding the space to progress out of the buildup when Burnley jump to the two 6s, City will have trouble building out and may have to play long into Agüero. This is where Tarkowski and Mee excel, so City may endure moments of the game where they find difficulty to progress out of the first phase.
Mendy’s reading of the situation to know when to make forward runs is crucial to pinning back Bardsley and allowing Sterling to be free in the half space. If Mendy is not able to occupy Bardsley with his arrival into the high and wide spaces, Burnley will be able to leave Cork in position, therefore preventing Walker from receiving to circulate and attack the opposite side.
By: Ryan Lamping
Credits
Words
Ryan Lamping
More from Breaking The Lines coming soon.
Visit the profile to follow and get notified when the next piece lands.