Tactical Analysis: Leeds United
After returning to the top flight for the first time in 16 years, Leeds United have enjoyed a phenomenal start to life in the Premier League under Marcelo Bielsa. From their first game against Liverpool, they made it clear that they would…
Illustrator Gabriel Foligno Photographer Nick Potts - PA Images
After returning to the top flight for the first time in 16 years, Leeds United have enjoyed a phenomenal start to life in the Premier League under Marcelo Bielsa. From their first game against Liverpool, they made it clear that they would not sacrifice their style of play for any opponent; Bielsa's side dominated possession and thrilled neutrals and fans with their attacking style of play, but they would end up losing 4-3 due to a late penalty from Mohammed Salah.
Since then, Leeds have beaten newly promoted Fulham in another nail-biting 4-3 shootout, beaten Sheffield United courtesy of a late goal from Patrick Bamford, drawn 1-1 with Manchester City, lost 1-0 to Wolves, and ended Aston Villa's winning streak with a thumping 3-0 victory at Villa Park. Six matches into the 2020/21 season, Leeds currently sit 6th in the Premier League table, ahead of Southampton, Crystal Palace and Wolves on goal differential.
What is Leeds United’s Style of Play?
Leeds's possession-based style of football is predicated upon their clever build-up play that begets numerical advantages and slick combination play to create goalscoring chances, as well as an aggressive man-marking system that requires maximum physical output from each of their outfield players.
“While the opponent has the ball, the whole team presses, always trying to cut off the play as close as possible to the opponent’s goal. When we get, it we look to play with dynamism and create the spaces from improvisation”-Bielsa.
Structural Adaptations
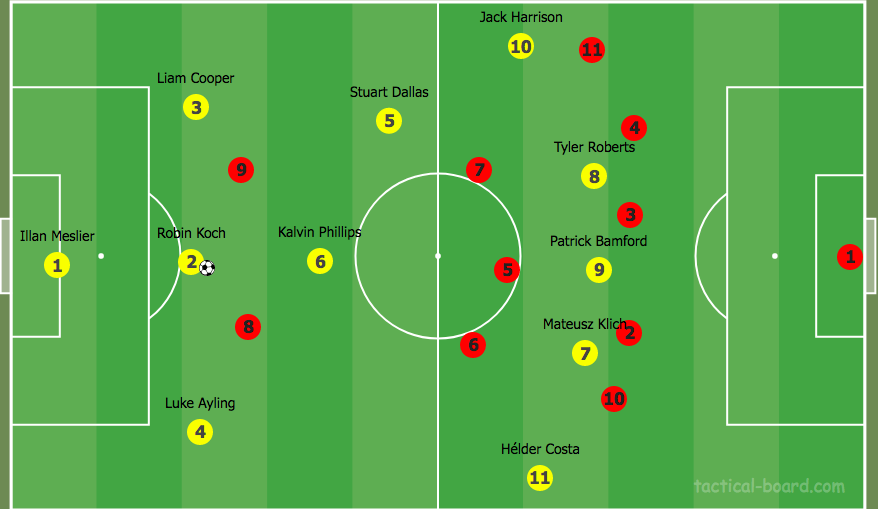
Bielsa tweaks his system depending on the opposing formation; if the opponents play with one centre forward (such as Wolves), Leeds will play with two centre backs; if their opponents play with two centre forwards (such as Sheffield United), Bielsa will opt for three centre backs, so that Leeds will constantly have an extra man in defense when compared with the number of opposing center forwards.
Similarly, if the opponents play with three center backs (such as Sheffield United), Bielsa will opt for two center forwards, whilst he will play one center forward if the opposing side uses two center backs (such as Manchester City). It should be noted that the only game this season where Bielsa has opted for three center backs has been the Sheffield United match, where Leeds won 1-0 at Bramall Lane.
The 4-at-the-back System
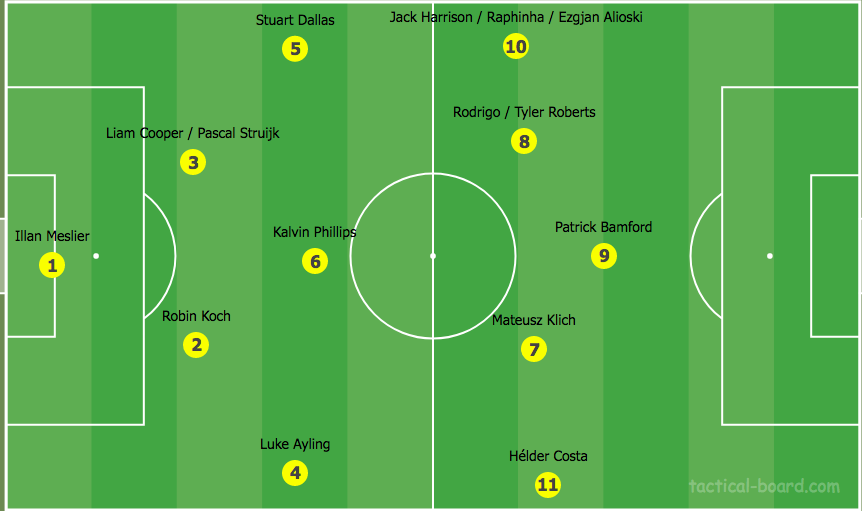
Build-up
Leeds build possession with their back four and their holding midfielder, Kalvin Phillips, although Pascal Struijk played there against Aston Villa, and will likely play there for the near future as Phillips has been sidelined for six weeks due to a shoulder injury.
In the build-up, the ‘#8s’ (typically Rodrigo and Mateusz Klich) position themselves high up the field and look for spaces to receive passes in between the lines. The wingers look to stay wide and give Leeds as much width as possible, whereas the #8s drop deeper in build-up to offer themselves as a passing option when required.
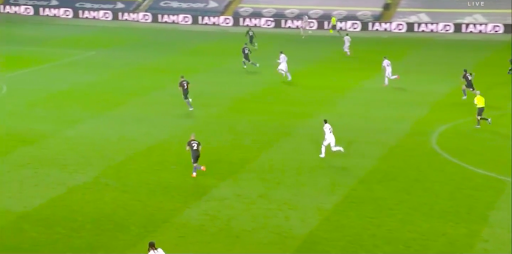
While they are comfortable circulating possession with simple passes, they also tend to play long balls into their five forward players (#7 to #11 in the image). All of the centre backs and Phillips are comfortable playing long passes into the forward players, and this is one of their primary methods of progressing play in the build-up.
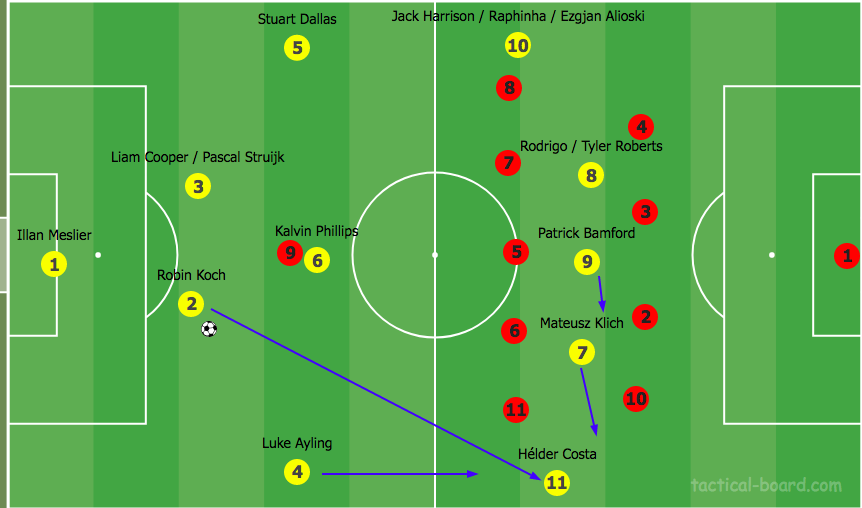
For example, if Robin Koch plays a long ball into Hélder Costa, Leeds have a strong chance of penetrating their opposition because Klich will be in between the lines (behind the opposition’s midfield) which gives Costa somebody to combine with.
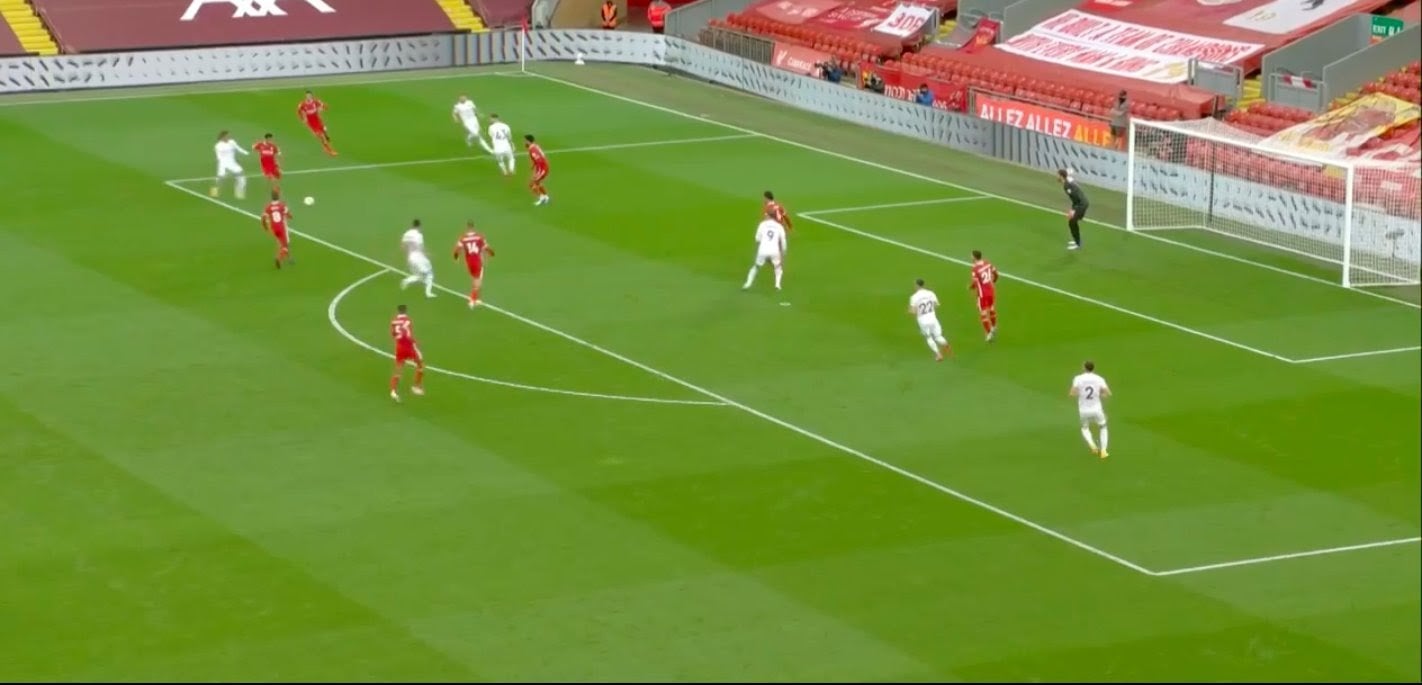
The full back, Luke Ayling on the right flank, will push up to join the attack. Bamford will also move across to join the attack, meaning that Leeds can have four men attacking a small area on the opposition’s flank. This approach works on both flanks.
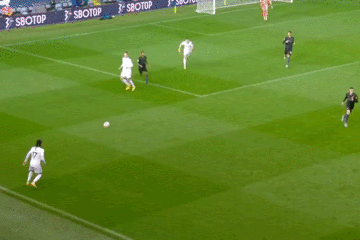
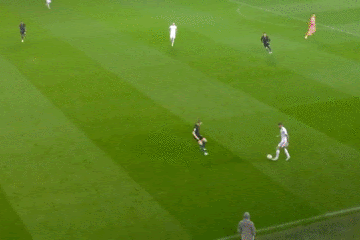
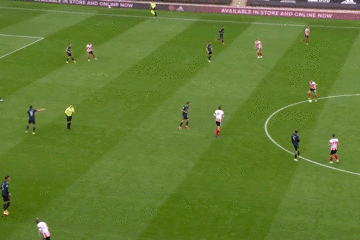
Here’s an example of Leeds playing a long ball and bypassing Manchester City’s midfield, thereby giving Leeds a 6v4 situation in the final third. These numerical advantages are extremely valuable and Bielsa’s side looks to create them as frequently as possible.
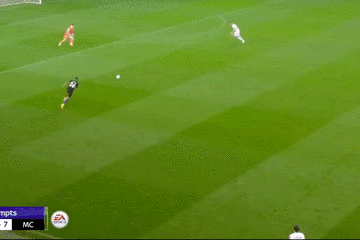
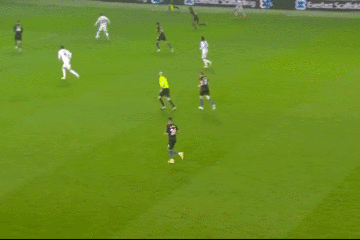
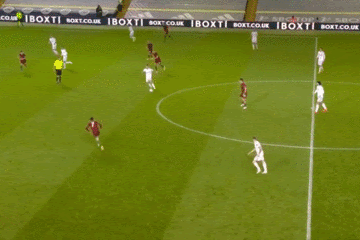
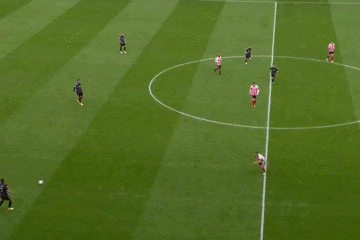
Here’s another example of Leeds using a long pass to progress play. Tyler Roberts has found space and Koch plays a long ball to the English striker which gets Leeds out of Manchester City’s press.
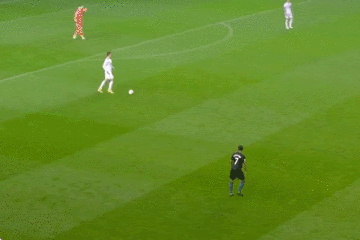
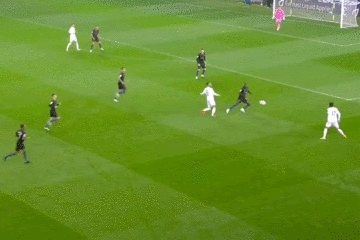
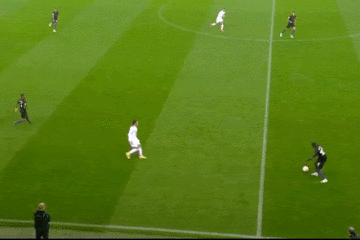
The beauty of the long ball aspect of Leeds’ play is that even if the opposition wins the header, Leeds can still fight for the second ball. Because they commit men forward, Leeds have a plenty of bodies around the ball which means that they have a good chance of winning possession.
Rúben Dias heads the long ball away here, but Hélder Costa wins the second ball and Leeds can now run at Manchester City’s backline. Klich and Rodrigo break from midfield and join the attack unmarked -- this is an example of Leeds’ midfielders getting ahead of their opposite numbers and outworking them.
However, Leeds United’s long passes can also backfire. Due to their front 5 being so high up the pitch, an intercepted pass can lead to a deadly counter attack from the opposition, as seen on October 3 against Manchester City.
Illan Meslier’s long pass is intercepted by Benjamin Mendy, who drives into space. City are running at Leeds’ defence, forcing them to defend deep. Raheem Sterling gets 1v1 with Ayling, cuts in from the left, and fires into the bottom right corner to open the scoring in the 17th minute.
Here's another example of Leeds finding themselves vulnerable on the counter after a long ball is intercepted. The opposition midfielders can counter if the long pass fails as the #8s, who are responsible for marking them, are bypassed as they push high up the field in the build-up.
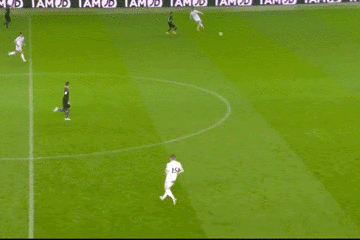
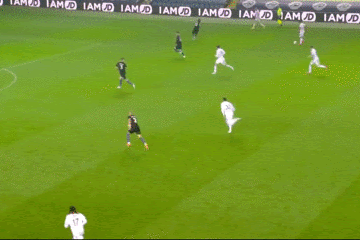
In the above GIF, we can see how Leeds efficiently maneuver the ball out of pressure. Meslier finds Stuart Dallas with a quick pass, who quickly controls the ball and passes it to Costa, before instantly making a run forward to offer the Portuguese winger the option for a return pass. The ex Wolves man plays a quick one-two to Dallas, who charges past De Bruyne and drives into City's half.
Attacking Features
Leeds's utilization of width is one of the most vital components of their attacking balance. Their front 5 (made up of the wingers, the #9 and the two #8s) spread wide and the wingers stay on the outside of the opposition’s defence, sticking closer to the touchline of the outside defenders, giving Leeds the ability to switch play and finding their wingers in 1v1 scenarios with the opposing fullback.
In this example, Wolves are defending narrow so Phillips switches play to Jack Harrison, who has the time and space to put in a dangerous cross which Bamford nearly gets on the end of, but Conor Coady does well to block it for a corner kick.
The wingers staying wide is also useful because the opposition full-backs can’t always see what the wingers are doing because they have their back to them. In the below example, Costa cuts it back for Ayling, who crosses it to the other flank. Ezgjan Alioski charges into Kyle Walker’s blindside and gets on the other end of the cross, but his header sails wide for a goal kick.

Leeds’ attacking play is full of impressive combination play, as seen in this one-two between Costa and Rodrigo. As soon as he passes to Rodrigo, Costa is on the move and gets away from Romain Saïss, allowing him to receive the follow-up ball in space. He then evades João Moutinho in a 1v1 duel, who pulls him down inside the box, but referee David Coote waved off shouts for a penalty.
Following up from the previously mentioned example, Dallas plays a quick one-two with Costa and charges into the opposing half, before playing another clever one-two with Klich in order to evade the ensuing Rodri. Immediately after receiving the return pass, Dallas finds Ian Poveda in space, who tees up the overlapping Ayling, who can then attempt a cross.
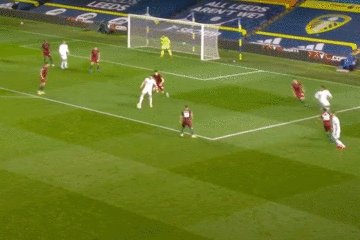
Here’s another example of clever movement from Leeds's attacking players; as Rodrigo squares up against Aymeric Laporte, Bamford takes a few strides towards the center of goal, before changing the trajectory of his run and moving to the near post. In doing so, he gets a tiny bit of separation from Dias, but Ederson does well to block the shot.
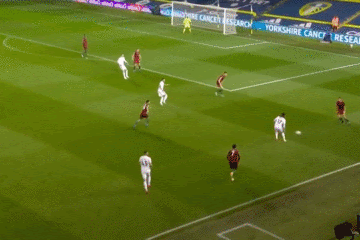
This is a frequent method of progressing an attack for Leeds. Ayling makes an overlapping run from deep to give Costa a passing option. He isn’t tracked by Mendy and manages to get a cross in, but it is blocked by Ederson.
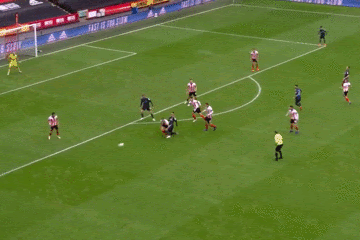
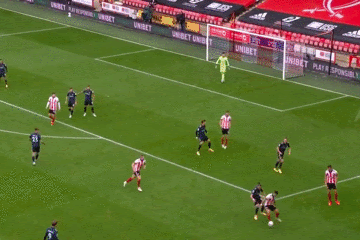
Despite having 64% possession and throwing on Rodrigo and Poveda in the second half, Leeds failed to break the deadlock against Sheffield United until the 88th minute. Klich wins the ball back and passes to Rodrigo, who turns and finds Harrison unmarked on the left flank.
As Harrison tees up the cross, Bamford cleverly positions himself between Sheffield United's defenders, but wiggles away from Ethan Ampadu and Jack Robinson to gain momentum and arrive in acres of space between Robinson and Enda Stevens. Thanks to his brilliant movement, Bamford can get himself into a prime scoring position, before heading the ball past Aaron Ramsdale and into the back of the net.
Pressing
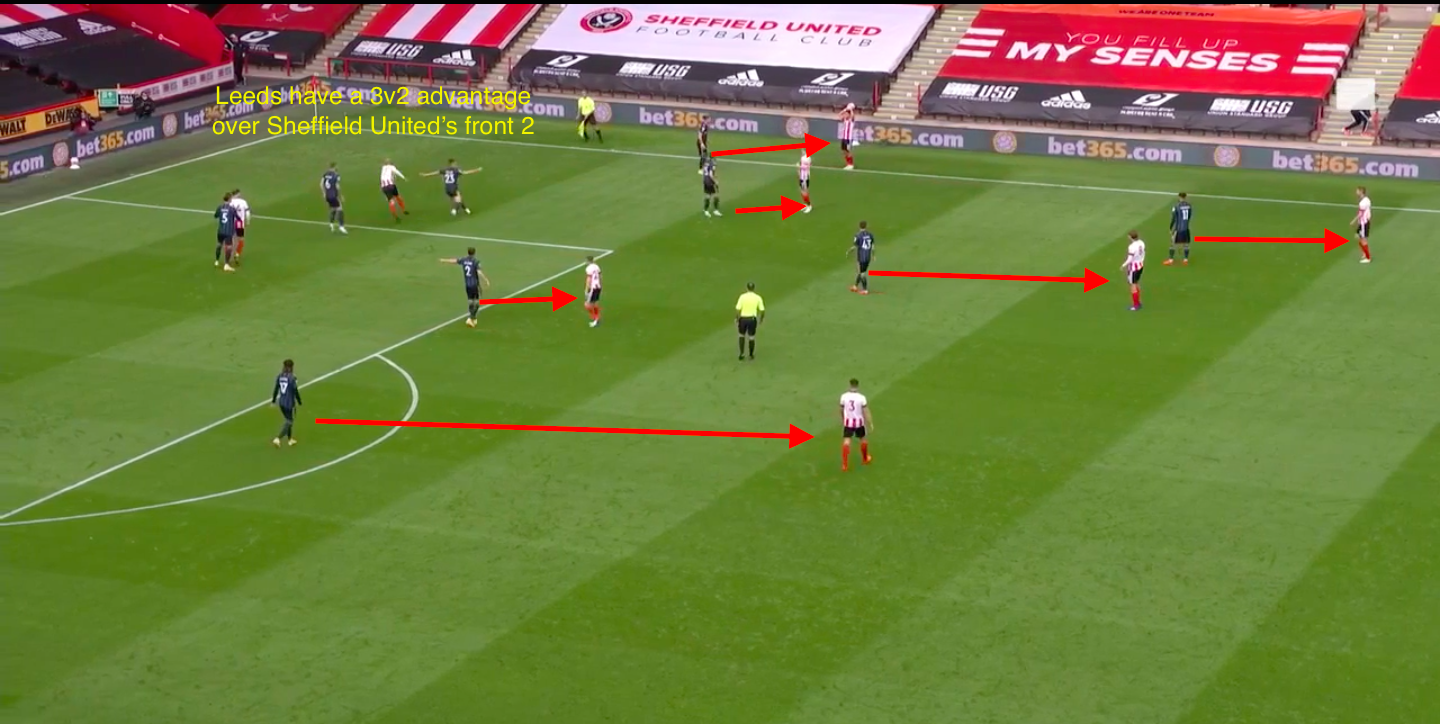
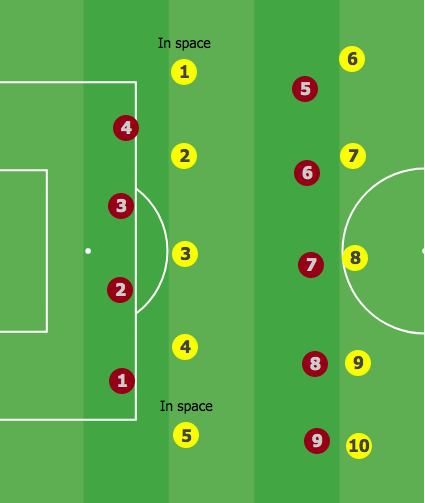
When the opposition play out from the back, Leeds allow two opposition players to be unmarked. One unmarked player is usually the goalkeeper, meaning the he usually has only one outfield passing option that is unmarked. They do this because they can’t go man-for-man on every opposition player, as Bielsa mandates that he has one more centre back than the opposition has centre forwards.
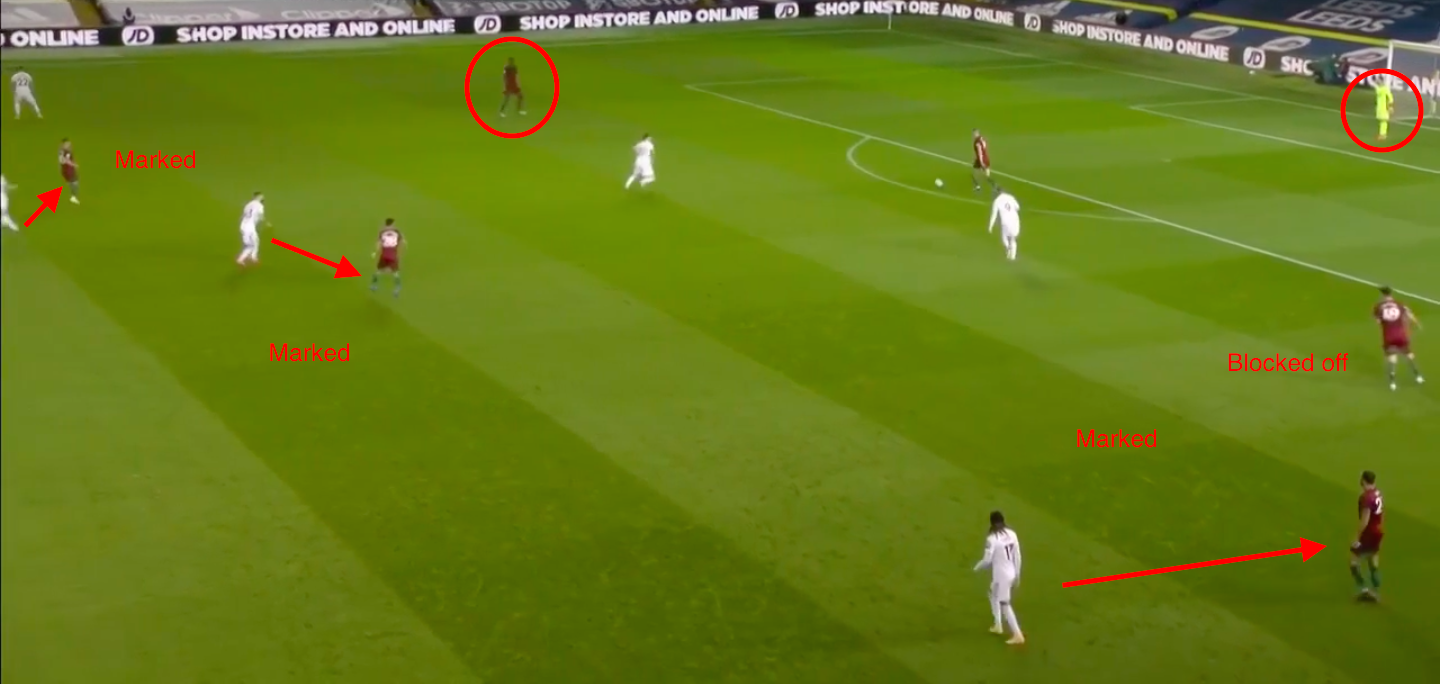
Leeds have to press with a front two (Bamford and Rodrigo) as Wolves are playing with three centre backs. This allows Wolves to have two unmarked players (Willy Boly and Rui Patrício) whilst the rest are marked.
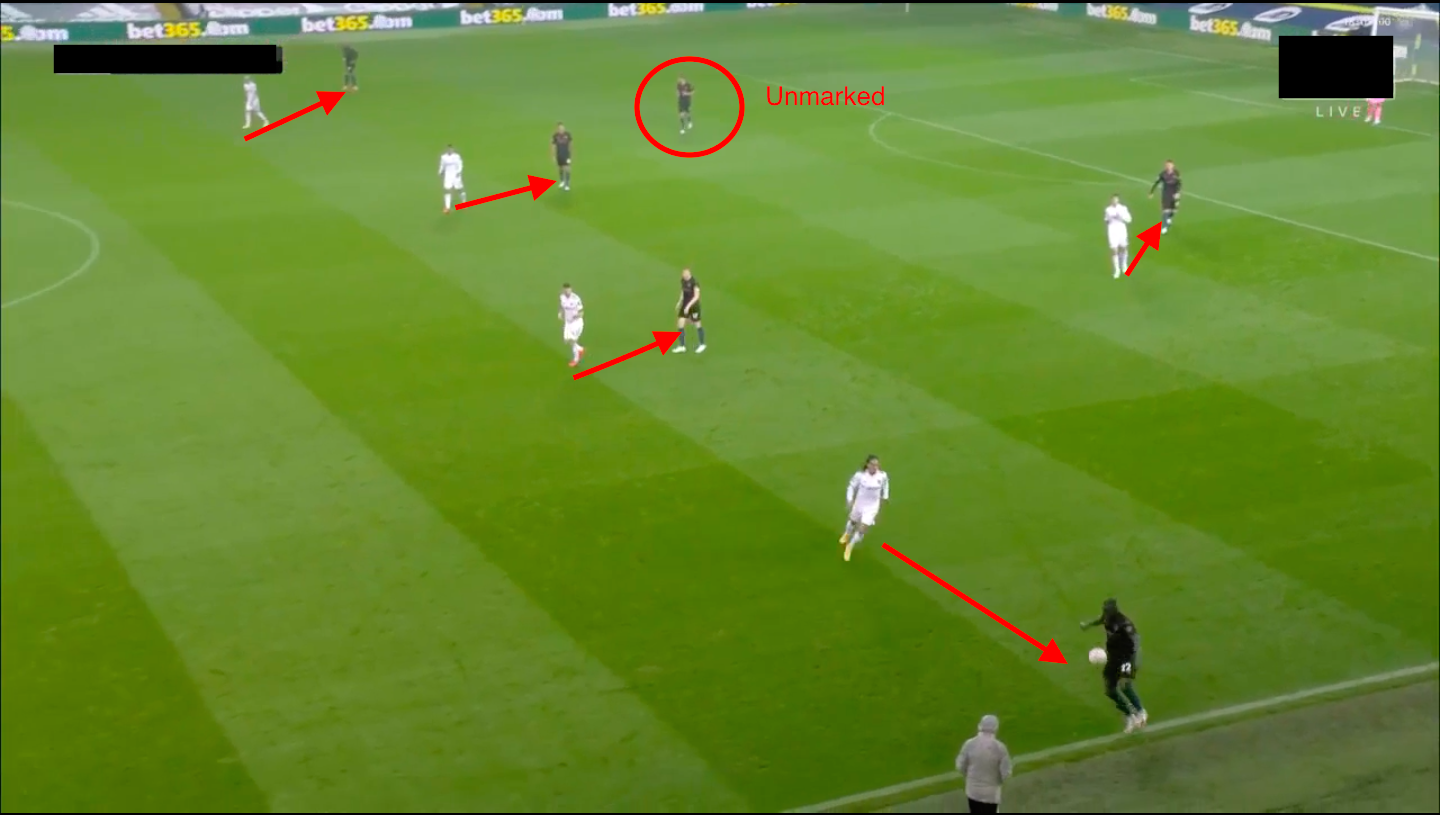
Here’s another example of Leeds’s man-oriented press. City have one outfield player that is unmarked (Dias), and whilst Mendy is being closed down by Costa, he has to drive down the pitch to find a safe passing option.
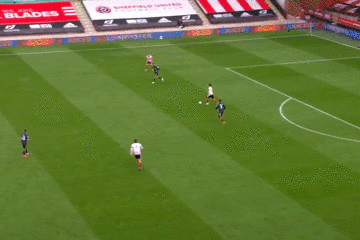
Here’s an example of Leeds pressing Sheffield United and winning the ball back. Their man-marking system reduces the opposition’s passing options, and after Stevens takes a poor first touch receiving a pass, Leeds now have a player ready to pounce on. Costa and Dallas converge on Stevens, with Dallas blocking the passing lane to Robinson, and Leeds win the ball back in a dangerous area.
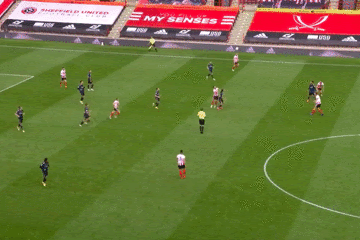
This is another example of Leeds’ man-oriented approach working well against Sheffield United. Sander Berge attempts to play a pass into David McGoldrick, who is marked by Ayling. The pass is intercepted by Ayling, and Leeds have an attacking transition. Leeds’s system is built to take advantage of any mistake in the opposition’s passing (the opposition passer’s margin for error is very small because everybody is tightly marked).
The 3-at-the-back System
Against Sheffield United, Leeds played with three centre backs (because Sheffield United played two centre forwards) and two strikers (because Sheffield United player with three center backs). Ayling moved alongside the centre backs and Stuart Dallas moved into midfield, as seen in their above structure on the ball.
Leeds built with a 3-1 structure and the wide players (Harrison and Costa) would drop in and join in with build-up when the ball was on their side. Dallas joined in with build-up when necessary and joined attacks when he had the space to do so. The back 3 still allows Leeds to get 5 players forward; the front two and Klich operate centrally whilst Harrison and Costa (the wide players) maintain the width.
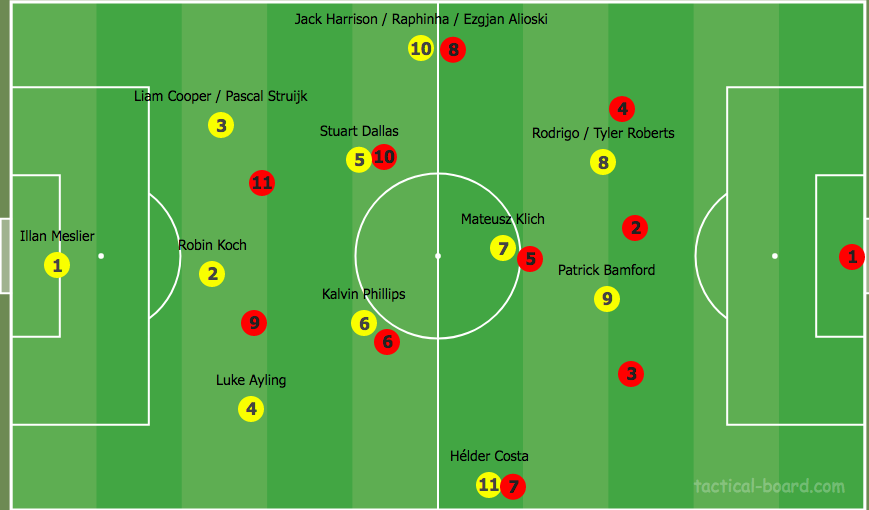
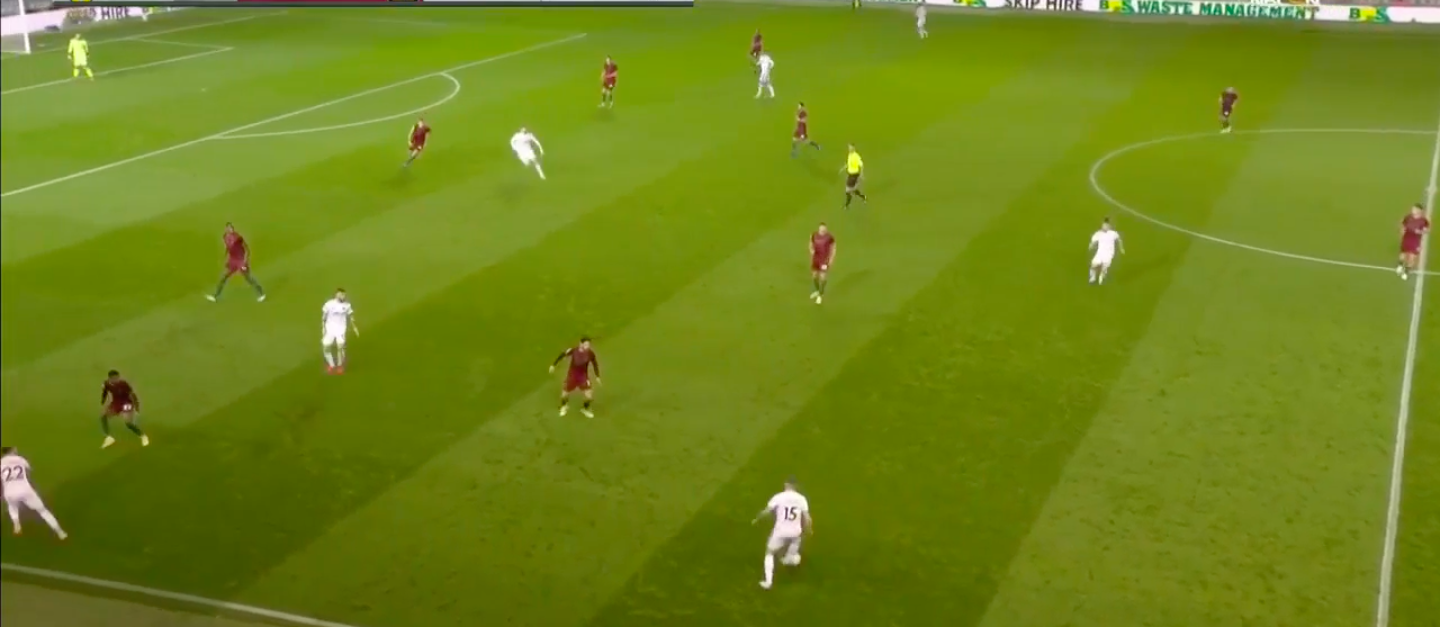
Leeds’ shape looked like a 3-4-1-2 when they didn’t have the ball, as seen in this throw-in from Sheffield United. As usual, they still allow two players to be unmarked whilst every other player is occupied by a Leeds player.
The centre-backs have a man advantage over the opposition centre-forwards; Bamford is outnumbered by two centre-backs whilst the rest of Leeds players are marking one player each. Interestingly, Leeds’ man-marking system means that they mark the player taking the throw-in (so that he isn’t free if he throws the ball in and someone plays a quick one-two with him).
4-4-2

This is an example of what Leeds would possibly look like without the ball against a 4-4-2 or any system with a back four and two centre-forwards (eg. Burnley and Southampton). They’d most likely use the same system in possession as they did against Sheffield United, but we will have to wait for their Boxing Day match against Burnley in order to confirm this.
Possible Weaknesses
Like all teams, Leeds United have weaknesses, most of which revolve around their man-oriented marking and exploiting Leeds's players when their physical output is reduced. The players's physical output has dropped off after around 60 minutes in a few games this season. Most notably, in their game against Manchester City, they seemed to be more fatigued than usual after the hour mark.
This unorganized and unthreatening attack results in Ederson claiming the ball and starting a counter-attack. Klich looks exhausted and doesn’t have the energy to get back in time to defend the counter, as De Bruyne sprints down the pitch and plays a one-two with Ferran Torres. Whilst Leeds committing their #8s high in attack is always a risk, it becomes far riskier when they are tired.
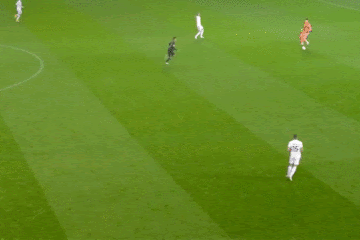
Here’s an example of Leeds committing 7 men forward against Liverpool. This isn’t a common occurrence but Leeds do pour men forward when they attack which can lead to them being vulnerable in transition, doubly so after the hour mark of matches.
On this occasion, Phillips loses possession after his pass to the left flank is blocked by Pedro Neto. The ball rebounds into the path of Daniel Podence, who plays a beautiful through ball to Raúl Jiménez, who finds himself isolated against Struijk.
Here’s an example of how opponents can exploit Leeds’ man-oriented system. Mendy plays a pass into Riyad Mahrez, who drops from his center forward position and plays a through ball to Raheem Sterling, who is making a blind-side run past Ayling and into the left flank.
Mahrez can receive the pass in ample space as Leeds don't defend in a block, and given the fact that his marker (Koch) is following him, he won't be able to get in front of Mahrez and block the pass. He then chips the ball around the corner for Sterling who is running into space; whilst Sterling cuts in from the left, De Bruyne makes an underlapping run and receives Sterling's pass, but his cross is blocked by Klich.
On this occasion, Stevens plays a quick one-two with John Lundstram, evading Ayling, advancing into space, and driving a low shot into the bottom corner, which Meslier does well to save.
Another weakness of the system is that the opposition can constantly get their players into 1v1 situations with Leeds’ players. This is useful for teams that possess attacking players that thrive in 1v1 situations, and it's no surprise that both Salah and Sterling got onto the score sheet against Leeds this season.
Because Leeds use a man-oriented system, players often have the space to dribble across a full-back and shoot (Leeds don’t defend in a typical block so the central areas are less congested). Quick players and players with clever movement can lose their marker, which can give them the space to progress play or shoot.
Whilst it isn’t easy to do, teams can use their spare man (the player that isn’t marked) to drive into space, as seen in this example where Sheffield United's Chris Basham roams forward and plays a pass behind the defense and into David McGoldrick.
McGoldrick makes a run, receives a pass and has the time and space to get a shot off. Because their system is exploited and their block isn’t compact, Leeds can’t stop Sheffield United from having the space to play the pass. Moreover, the reactive nature of the system means that it’s very difficult for the Leeds defender to stop McGoldrick from receiving the pass after making the penetrating run.
Expansive Sides
Bielsa’s side enjoys playing against sides that will press them, that try to dominate possession, and that try to attack them as much as possible (most ‘big 6’ sides play like this, alongside some mid-table sides). Leeds enjoy this because they’re comfortable playing out from the back and believe they will outwork their opposition.
Teams that press will leave space in behind them, and Leeds can play out of the back, utilize width and runs in behind, and combine with teammates to exploit the high lines. Teams that attack Leeds will give them counter-attacking opportunities. These games will be open which suits Leeds as there will be more space for their #8s and wingers to exploit on the counter.
Whilst attacking sides can exploit them, they give Leeds plenty of opportunities to assert their game (we’ve seen this with their narrow 4-3 defeat to Liverpool and their 1-1 draw against Manchester City).
Low blocks
Low blocks will congest the space that Leeds can play in, meaning that Leeds’ #8s will have less space in between the lines, making it harder to find passes in between the lines. Due to the congestion in central areas, these passes become a lot riskier as there’s less margin for error.
Here’s an example of Sheffield United being compact and congesting central areas. Ayling plays a pass in between the lines to Klich, but Sheffield United get three bodies around him, win the ball back, and launch a counter-attack.
Deep-lying defences also make it harder for Leeds to get players in 1v1 situations, as they will be compact and ensure that the pitch is congested when they get into dangerous areas. Furthermore, Leeds don’t have as much individual quality that can provide them with moments of brilliance to unlock a defence.
Teams that play with five at the back typically defend deep and are better suited to dealing with Leeds' width. On the other hand, the back four struggles to deal with Leeds' width due to their narrow positioning and numerical disadvantage. The back five are better suited to dealing with Leeds' width and match them for numbers, thus reducing the effectiveness of Leeds' cross-field switches.
Whilst Leeds often dominate possession and create chances against low blocks, they’d much rather play against more open and expansive sides. In their game against Wolves, Leeds dominated proceedings but didn’t create a lot of opportunities to score against their deep block.
Wolves waited for Leeds' players to tire and then began to attack as the game became more open. Jiménez received a long pass from Max Kilman on the right flank and dribbled past Struijk and Dallas, before launching a shot at the edge of the box. The ball took a lucky deflection off Phillips, and bounced into the right corner of the net. Wolves retreated into their low block and held onto the clean sheet.
Conclusion
Whilst there’s still a lot to learn about Leeds as the season goes on -- whether they can keep up their physical output and how their system fares as time goes on -- the quality of their play and the entertainment that their matches provide are undeniable.
Not only are they always competitive, Leeds have a unique style of play that is proving to be effective. Their tenacious style of play, tremendous physical output, and sensational attacking play make them an incredible watch. After returning to the Premier League, Leeds are showing everyone that they’re here to stay and they’re doing it in some style.
By: @Tacticalnovice1
Credits
Words
@Tacticalnovice1
More from Breaking The Lines coming soon.
Visit the profile to follow and get notified when the next piece lands.