Tactical Preview: Real Madrid vs. Manchester City
With Manchester City failing to protect their title as Premier League Champions, there has been a spotlight on their performance in the Champions League this season. Despite a 2-1 away win in the first leg of the round of 16 back in February, the Citizens face a tough task to progress past the recently crowned and high flying La Liga Champions.
Real Madrid have fine tuned their tactics since the resumption of play has resumed and, despite currently sitting as 3/1 underdogs according to Sports Betting Dime, Los Blancos pose a heavy threat to Pep Guardiola’s illusion to lift the Champions League trophy with Manchester City. Nevertheless, City’s success may hinge on Pep’s ability to set his team up to exploit the space that Real Madrid give to the opposition. This article suggests a way that he can do just that.
Real Madrid In Possession
Build Up: Real Madrid build in a 3-3-4-1, with Casemiro positioning himself as the defensive midfielder typically between Toni Kroos and Federico Valverde.
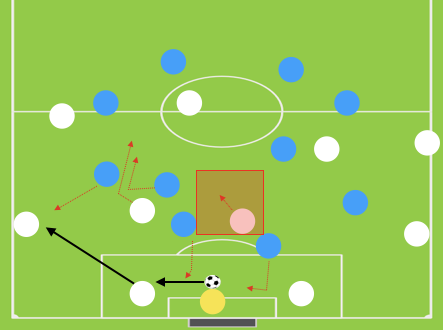
Against teams that press while marking Casemiro, the Brazilian makes a movement up the pitch, dragging the defender away from the “6” space. As Casemiro makes this movement, the interior (who starts high in the halfspace) drops deep into the space vacated by Casemiro and his marker.
Karim Benzema and the left winger play a key role in filling the vertical channel that the interior vacated. This occupation of space makes the opposing midfielder less likely to follow the dropping interior. The interior is then free to progress play from deep.
When the opposition set pressing traps on the reception of Madrid’s fullbacks, Real Madrid often drop one of their advanced midfielders next to Casemiro in the buildup.
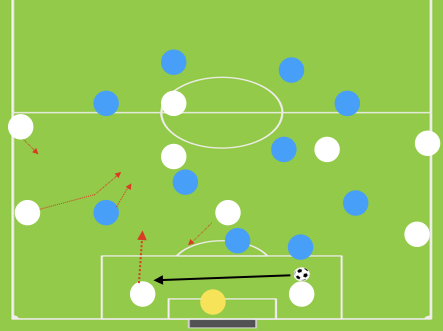
As this pass is played, the ball sided 6 moves forward through the half-space. This movement provides an offer of vertical progression (through the advancing ball sided 6) or horizontal progression (ball sided 6’s movement clears space for opposite 6 to receive).
Real Madrid invert the opposite fullback in the first phase behind the opposition’s midfield line (2nd line). This creates space for the free centre back to drive into. The movement from the inverted (advanced) fullback plus the advancing centre back pries away the midfielders, leaving the winger 1v1.
For insurance in these situations, Madrid often drop their 6 into the back line to replace the progressing centre back in case of a transition or a need to return and maintain possession of the ball.
2nd Phase: Real Madrid are incredibly fluid when facing mid-blocks. Primarily, they set up in a 1-4-1-2-3 shape. Most of their solutions revolve around occupying the correct spaces while long switches of play occur.
Real Madrid drop their opposite interior deep while pushing the opposite fullback forward and the opposite winger into the half-space. The winger drops slightly to expand the spacial distance between himself and his advancing fullback, creating more space on the 2v1.
This pattern to attack the opposition’s fullback also provides a setup to win the 2nd ball (3v2). If the opposition winger tracks the fullback, then the deep interior is available for the switch of play.
Casemiro or Toni Kroos drop into the back line to form a back three. Benzema and a winger occupy the half spaces. As the ball is circulated through the back 3, the player in the opposite half space moves deep and towards the ball. This manipulates the fullback’s positioning and momentum, giving time for the winger to receive and drive 1v1 at the fullback.
If the pass is mis-hit or miscontrolled, Madrid have both the fullback and deeper midfielder to contain counter attacks. If the pass is completed, the winger can drive at the fullback 1v1 or an overlap from Madrid can create a 2v1. The opposition winger is originally drawn to the false FB, meaning if the overlap is executed at a fast pace, another defender will not be drawn over and condense the space.
Ferland Mendy inverts into the left half space with forward momentum. He attacks the space between the opposition’s fullback and centre back and runs into the channel. This forces the opposition’s winger to either track Mendy deep or to interchange marks with the fullback. Mendy’s movement allows space (time) for the winger to receive a long switch.
If the winger stays with Mendy, his threat on the counteract is diminished. If the winger interchanges with the fullbacks and takes the responsibility of defending the winger 1v1, it is a battle Real Madrid will take all day long. As the pass is played, the opposite interior drops deeper to provide protection for counterattacks.
Final Third: The quality of profiles that Real Madrid’s squad possesses makes 1v1 situations in the final third incredibly dangerous for the opposition. Because of this, it is unsurprising to see manager Zinedine Zidane attempt to create a high number of these scenarios.
Real Madrid overload central areas to optimize space for the wide players 1v1. This central overload not only isolates the wide player, but it also leads to Madrid arriving with a high number of players into the box.
If the winger is struggling to beat the wide defender 1v1, Real Madrid often shift to overload the ball side. An overlap occurs to draw away the opposition’s winger to create space for a cut back to a (deeper) midfielder. He then switches the ball to the opposite advancing fullback.
To create further space for this fullback, Real Madrid’s opposite winger makes a run towards the box. Upon the fullbacks reception, Madrid’s opposite side overload attacks the space in the area.
In Possession to Out of Possession Transition
From 2nd Phase: If Real Madrid turn the ball over when attacking the overloaded side, the closest player immediately applies intense pressure onto the opposition player in possession of the ball, aiming to force play wide into where the Real Madrid numbers are.
The rest of his teammates cut off the passing lanes before condensing the space around the ball to force a turnover from the opposition. The ball side centre back for Real Madrid often steps out of the back line, getting close to the outlet player. The opposite centre back is trusted to cover the space in behind him should the ball be played in behind.
Very rarely do Madrid turn the ball over off one of their long switches of play due to the set up to win the 2nd ball. However, if they do, their counter press is situational: Lots of space present = contain and drop into mid block. Little space and on sideline = counter press.
From Final 3rd: Due to Real Madrid’s overload in the centre of the pitch in the final third, the distances between the players is set up to counter press immediately after conceding possession of the ball.
With the centre backs taking up advanced positions while in possession, the space is already reduced for the opposition once the transfer of possession occurs. This sees Real Madrid play for long periods in the final third, pinning the opposition in.
Real Madrid Out of Possession
High Press: Real Madrid start their press in a 1-4-4-2 shape.
Once Real Madrid’s line of confrontation is met in the 1st phase (usually is set at the goalkeeper), Real Madrid’s midfield line must advance up the pitch to compact the space around the ball in sync with their first line. However, this leaves space for the opposition off the shoulders of Madrid’s centre midfielders.
To deal with this, Madrid jump their centre back up into the midfield line, morphing their press into a 1-3-4-1-2 shape.
With the profiles of Raphaël Varane and Sergio Ramos (both incredible at reading when to jump to the midfield and also at covering the space behind their advanced partner), Real Madrid are able to close the dangerous space between the lines that the opposition attempts to operate in to break the press.
After the centre back jumps to the midfield line, the “new” dangerous space becomes in behind the jumped centre back. This space is incredibly difficult for the opposition to exploit.
2nd phase: Although Real Madrid post an elite high pressure set up in the first phase, they most regularly drop into a mid block out of possession. The shape that Real Madrid use in the 2nd phase is a 1-4-1-4-1 mid block.
Once the line of confrontation is met (usually 5 meters into the opposition half), an outside centre midfielder steps to join the first line, applying pressure to the free centre back.
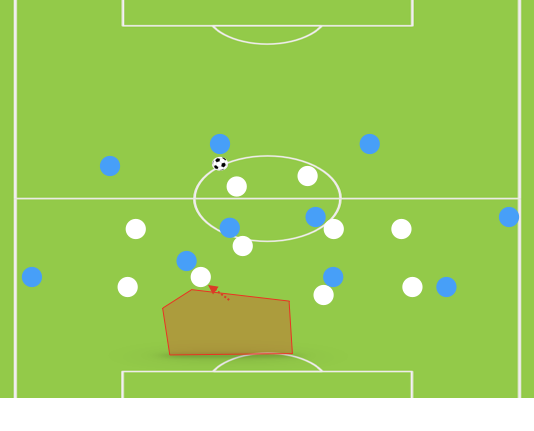
This jump to the first line is timed with Casemiro stepping into the second line, picking up the free man that the outside midfielder just left. This means that the dangerous space now becomes the area that Casemiro just vacated (in front of the centre backs).
If the opposition occupy this space that Casemiro vacated, one of the centre backs steps out of the back four to mark him. Similarly to the 1st phase, this makes the dangerous space behind the advanced centre back. In contrast from the 1st phase, the dangerous space is much harder to exploit from the 2nd phase as the distance between the back four and goalkeeper is reduced for the opposition to expose.
3rd phase: Real Madrid’s deep block is a 1-4-1-4-1 shape.
Casemiro sits very deep, just in front of the two centre backs. This allows the centre backs to jump forward to the free man between the lines while maintaining a distance short enough for Casemiro to fill the gap.
It is not advisable to leave gaps in the back four this close to the goal, which is another reason why Madrid would rather prefer to defend in their mid block.
This also provides the ability for the centre backs to drift wide to aid the fullbacks when they are 1v1 against an opposition winger. If the fullback gets beat, the winger immediately faces another defender to beat. It also fills the channel, preventing the opposition from attacking the vacated space while the fullback steps out of the back line.
Out to In Possession Transition
From 2nd Phase: Real Madrid often win the ball back in their mid block by the jumping centre back intercepting the pass into the “free man”. This forward momentum leads to a counter attack at an electric pace. The centre back usually looks to play wide to a winger in a 1v1 situation.
This centre back usually continues his run into the penalty area, looking to get onto the end of a cross from the winger. Ramos is extremely adept at arriving into space in the area to attack crosses in from the winger.
From 3rd phase: Karim Benzema is the sole outlet for Madrid after possession is won in their deep block. However, he has been elite this season when tasked with making the correct decision while holding the ball up; whether he sets it back immediately to a runner beneath him or holds onto the ball until more of his teammates progress up the pitch, he seems to almost always elect the correct option.
Real Madrid’s wide players burst forward up the pitch and often become the 3rd man to the set off Benzema.
Anticipated Starting XI
I anticipate that Zidane will elect a 1-4-1-2-3 shape in possession and a 1-4-1-4-1 shape out of possession as they have both been very successful for them since the restart.
Eder Militão will replace the suspended Ramos, who will undoubtedly be a huge miss. Varane will move to the left-centre back role as he has in the previous four games that Ramos has not played. Ferland Mendy and Dani Carvajal will be relied on to provide dangerous crosses after receiving from long switches of play.
Casemiro, Kroos, and Luka Modrić will be selected to create spaces with their movements to progress up the pitch quickly. Eden Hazard and Marcos Asensio must create havoc from the 1v1 situations Madrid will attempt to put them in. Benzema’s recognition of the correct space to occupy will be a key factor in the success that Real Madrid has in the tie.
Surprise Starting XI
An unexpected XI that Zidane could choose could see him elect for a 1-4-1-2-1-2 diamond shape, with Isco and Marcelo replacing Asensio and Mendy respectively.
Isco’s inclusion into the XI would provide Madrid a player that naturally is positioned as a number 10, helping them to exploit the space behind Rodri when the Spaniard jumps from City’s mid-block.
Marcelo has an incredible final ball that will cause problems for City. Kroos and the speedy Varane will be able to provide adequate protection for the Brazilian fullback who will progress forward up the left flank. Hazard would be able to occupy the left half space more regularly and be closer to Benzema to receive sets off the Frenchman which would allow him to dribble forward unmarked at a high speed.
However, this set up will leave an enormous task for Militão to manage. Carvajal will be tasked with occupying an attacking threat from the right and with Modrić also playing on the right side of the midfield, Militão could quite easily be isolated far more often than Madrid would want.
How Man City Can Expose Real Madrid
My XI contains the profiles that will best fit my solution to exploit the dangerous space that Real Madrid give the opposition.
Against Real Madrid’s high pressure in the 1st phase, the 3 “forwards” selected will be able to occupy the 3 zones off of the back shoulders of the centre midfielders of Real Madrid. This will overload Real Madrid’s midfield and ask the question of how many numbers they are actually willing to commit to the press.
If Madrid step only one centre back and decide to pinch their wide midfielders in, then both of City’s fullbacks will be available to receive a chipped pass, eliminating two lines of Real Madrid’s pressure.
If Madrid step with both centre backs, then Mahrez will be able to run into loads of space in behind Madrid’s last line, 1v1 against Mendy (low risk). If Madrid decide to drop one (or two) of the centre midfielders off the press, Man City can build out with ease.
Against Real Madrid’s mid block, Kyle Walker, Eric García, and Aymeric Laporte will create a 3v1 against Benzema. This excessive overload will encourage one of Kroos or Modrić to jump to join Benzema in the first line.
This will see Casemiro step to Rodri, creating space between the lines for De Bruyne. This invites Varane to step to Kevin De Bruyne – making the dangerous space behind Varane. Raheem Sterling is the free man due to Casemiro’s jump and will be able to exploit this space in behind.
The two of Rodri and Bernardo Silva beneath the staggered three of De Bruyne, Sterling, and David Silva will provide another solution to exploiting the space behind the jumped centre back. These 5 players all have an incredible sense of extending their lines to the maximum while still being available to receive penetrative passes. They also have superb understanding of being the 2nd or 3rd man in combinations; which will destroy Madrid’s back four.
Up -> back -> through combinations are such an effective way to break Real Madrid’s pressing scheme as this combination is encouraging the centre back to step out. An up -> back -> through combination will always have the free man running in behind the jumped centre back, exploiting the space that Real Madrid give.
If these five midfielders are constantly extending their passing lines and looking to be active in 3rd man combinations, Real Madrid’s back line will stand no chance keeping Manchester City off the score sheet.
The relative close nature of the 5 midfielders selected will provide a structure for Manchester City to counter press immediately after turning the ball over in the centre of the pitch. Because they will occupy spaces between the lines and constantly will overload the midfield two of Real Madrid, the player in possession for Real Madrid will not know which City player will apply the immediate pressure – increasing the chance for City to force a turnover and win the ball back quickly.
If the immediate counter pressure is broken, City should reset into a 1-4-5-1 mid block. Sterling will be the forward, with David Silva and De Bruyne joining Rodri in the centre of midfield, flanked by Bernardo Silva and Riyad Mahrez. The 5 across midfield will help to occupy the width of the pitch to prevent the block from having to shift a large distance.
Both Bernardo and Mahrez have the engines to track Madrid’s fullback. Sterling will act as the outlet to relieve the immediate pressure from Real Madrid after they lose the ball. If Sterling can set and spin into the space behind him, it is likely that the likes of De Bruyne and David Silva will be able to put him through on goal.
City should elect to press Real Madrid in a 1-4-4-2 while they build to attempt to force them into playing long switches when Los Blancos are not fully set to do so. This could lead to major goal chances for City.
Potential Threats to the Game Plan
When Manchester City are in possession, the set up does lack natural depth on the left side. However, if this becomes a large issue, Sterling can quite easily swap with David Silva and maintain depth on the left side.
As Mahrez is the main depth provider in possession for Manchester City, he could potentially struggle with the distance to recover to his right midfield position out of possession. If Real Madrid exploit this quickly, it will be a big help for breaking City’s mid and deep block.
Oleksandr Zinchenko has shown throughout his stint at Manchester City that he struggles with defending long switches of play in behind him. Knowing this, Real Madrid could emphasize switching the play from left to right to try to expose Zinchenko’s lack of certainty in defending the long balls.
Sterling’s ability to perform as an outlet will be critical to ensure that Real Madrid don’t spend long phases of the game attacking in the final third. He must maintain possession of the ball long enough to allow City’s midfielders to run off him to progress City out of their deep block.
By: Ryan Lamping
Featured Image: @GabFoligno


